It is almost two years old of my Crucial BX100 256GB SSD. Now, I upgraded its firmware from MU01 to MU02. Then I did the benchmark test. The result is very clear that new firmware improve the performance.
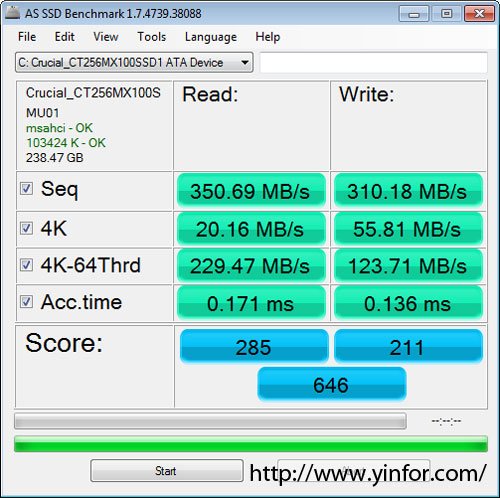
The original test I did in 2014 shown as below:
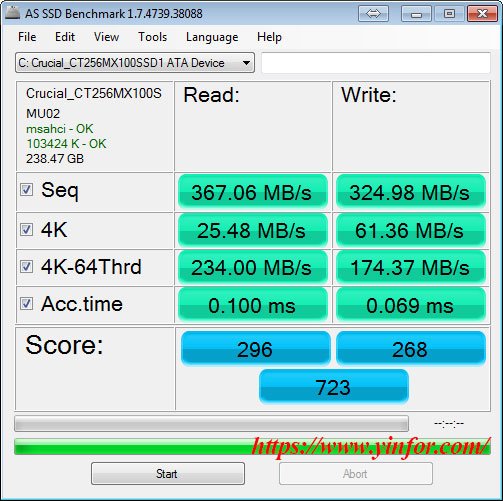
AS SSD Benchmark test Result on Crucial BX100 256GB SSD with MU02 Firmware
The new test I did ten minutes ago.
All test results are better than before. Same PC, Same SATA driver. Just different firmware.
Check the details of the benchmark report.
AS SSD Benchmark 1.7.4739.38088
——————————
Name: Crucial_CT256MX100SSD1 ATA Device
Firmware: MU02
Controller: msahci
Offset: 103424 K – OK
Size: 238.47 GB
Date: 5/18/2016 1:58:33 AM
——————————
Sequential:
——————————
Read: 367.06 MB/s
Write: 324.98 MB/s
——————————
4K:
——————————
Read: 25.48 MB/s
Write: 61.36 MB/s
——————————
4K-64Threads:
——————————
Read: 234.00 MB/s
Write: 174.37 MB/s
——————————
Access Times:
——————————
Read: 0.100 ms
Write: 0.069 ms
——————————
Score:
——————————
Read: 296
Write: 268
Total: 723
——————————
I will give the credit to the new firmware. Let’s look at the release notes of this firmware.
Release Date: 04/14/2015
Firmware for the BX100 (all form factors) is being updated from version MU01 to MU02. The BX100 is updateable to this new firmware starting from previous versions using tools provided by Micron.
This update will be mandatory cut-in for new product built in Micron factories, and is an OPTIONAL update for any drive in the field. For end users, it is recommended if the user is experiencing or wishes to prevent an issue related to the following items.
Version MU02 includes the following changes:
-
Improved Device Sleep and Slumber transitions.
-
Corrected SMART attribute threshold values.
-
Improved general reliability and stability.
When I do the firmware upgrade, it provides two optional methods.
The first one, which I used, is to use Crucial Storage Executive.
I just download this Crucial software, and installed it on my Windows 7. Run it and use Live update. Then reboot. All done.
The second one is to download an ISO file.
It takes time to download a ISO file; Burn it to a CD or USB drive; Boot the PC with this bootable media; upgrade automatically; reboot.
It worth to do it.
