I am a newbie of WordPress.
To implement a tag system for this site. I try some different tag plugin.
bunny-tags, UTW, and simple-tagging.
Finally, I choose Simple Tagging. It is really simple to install it on WordPress.
The installation step:
1) Download package, Download v1.6 file
2) Decompress it and put the files into your plugins directory (/wp-content/plugins/).
3) Enable the plugin in the WordPress Plugins admin page.
4) Go to WordPress Admin > Tags > Tag Options, adjust the options and save.
5) Go to WordPress Admin > Options > Permalinks and press the button to update the permalink structure.
The Tag Options has lots of configuration. Be carefully when you modify them.
I want to show my Tag Cloud codes for you.
Customize your Tag Cloud:
1) Tags > Tag Options > Cloud tag link format: Change it as below
<a title="%tagname% (%count%)" href="%fulltaglink%" class="t%scale%">%tagname%</a>&nbsp;[perl] 2) Add following code into your theme template file, I added it into sidebar. [perl]<?php STP_Tagcloud(); ?>
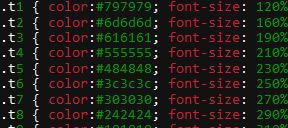
3) Add following CSS code into your stylesheet
.t1 { color:#797979; font-size: 120%; }
.t2 { color:#6d6d6d; font-size: 160%; }
.t3 { color:#616161; font-size: 190%; }
.t4 { color:#555555; font-size: 210%; }
.t5 { color:#484848; font-size: 230%; }
.t6 { color:#3c3c3c; font-size: 250%; }
.t7 { color:#303030; font-size: 270%; }
.t8 { color:#242424; font-size: 290%; }
.t9 { color:#181818; font-size: 310%; }
.t10{ color:#0c0c0c; font-size: 330%; }
That’s all.
Notes:
The official site of this plugin

